Introduction
Bathroom mildew cleaning guide — if you’re dealing with stubborn spots, musty smells, or recurring moisture issues, you’re in the right place. Mildew builds up quickly in humid bathrooms, but with the right methods, you can remove it effectively and keep it from coming back. In this guide, you’ll learn what causes mildew, how to clean it safely, and the best preventive steps to keep your bathroom fresh and mold-free.
Table of Contents
What Is Mildew and Why Does It Grow in Bathrooms?
Mildew is a type of fungus that thrives in warm, moist environments—making bathrooms one of the most common places for it to develop. In this bathroom mildew cleaning guide, it’s important to understand what mildew is before learning how to remove it. Mildew usually appears as flat, powdery patches that range from white and gray to light brown. Although less aggressive than mold, it can still damage surfaces, stain grout, and affect indoor air quality if not addressed quickly.
Bathroom conditions naturally encourage mildew growth. Every time you shower, humidity levels rise, and without proper ventilation, this moisture lingers on tiles, grout lines, walls, and even ceilings. Standing water, soap residue, and poor airflow create a perfect breeding ground for fungal spores. Bathrooms with no exhaust fan, small windows, or infrequent cleaning often develop mildew faster.
Another reason mildew grows easily is because bathroom surfaces dry slowly. Damp towels, wet bath mats, and dirty caulking trap moisture, allowing mildew to settle and spread. Hard-to-reach spots—such as corners, behind faucets, or around shower doors—hold moisture longer than open surfaces.
Understanding how mildew forms is the first step toward preventing it. When you know what triggers its growth, the rest of the bathroom mildew cleaning guide becomes much easier to follow and apply effectively in your home.
Signs You Have Mildew in Your Bathroom
Identifying mildew early is one of the most important steps in any bathroom mildew cleaning guide, because catching it sooner makes the removal process much easier. Mildew often begins as small, subtle spots, and many homeowners confuse it with regular dirt or soap scum. Knowing what to look for helps you take action before the problem spreads.
Visual Indicators
Mildew typically appears as flat, patchy spots in shades of white, gray, yellow, or light brown. Unlike mold, which grows in fuzzy or slimy clusters, mildew looks powdery or chalky. You’ll commonly see it forming on shower tiles, grout lines, window sills, or areas where moisture sits for long periods. If the discoloration spreads quickly or forms a thin, even layer, it’s almost always mildew.
Unpleasant Odors
Another strong sign is a musty, stale smell that lingers even after cleaning. This odor usually comes from damp areas that aren’t drying properly. If your bathroom still smells “wet” hours after a shower or has a sour scent around the tub or sink, mildew may be growing somewhere nearby.
Texture Changes on Surfaces
If you rub your finger across a suspicious patch and it feels powdery or easily flakes away, it’s likely mildew. Mold tends to be thicker, fuzzy, or sticky, while mildew stays thin and dry on the surface.
Hidden Spots to Check
Mildew doesn’t always appear in open areas. It often grows in corners, behind fixtures, or in places you rarely inspect. Make sure to check:
- Behind the toilet
- Under the sink
- Around faucet bases
- In caulking lines
- On shower curtains
- Along window frames
- Around the edges of glass shower doors
If any of these areas feel damp, darkened, or show patchy discoloration, it’s a sign mildew has begun to spread.
Recognizing these early warnings helps you follow the rest of this bathroom mildew cleaning guide more effectively, ensuring your cleaning routine targets all the right areas.
Step-by-Step Bathroom Mildew Cleaning Guide
Removing mildew doesn’t have to be complicated. With the right tools and a simple routine, you can clean your bathroom effectively and keep mildew from coming back. This bathroom mildew cleaning guide walks you through each step so you can safely and confidently restore cleanliness to any affected area.
Safety First: Gather Your Tools & Protective Gear
Before you begin, make sure you have the essentials ready. Mildew spores can irritate your skin and lungs, so proper protection is important.
You will need:
- Rubber gloves
- A face mask
- Protective eyewear
- Scrub brushes or old toothbrushes
- Microfiber cloths
- Spray bottle
- Bucket
- Sponge
Choose the Right Cleaning Products for Mildew
Different cleaners work for different levels of mildew. In most bathrooms, a mix of natural and commercial products gives the best results.
Natural Cleaning Options
- White Vinegar: Great for routine cleaning and mild mildew.
- Baking Soda: Helps scrub without damaging surfaces.
- Hydrogen Peroxide (3%): Excellent for tougher mildew spots.
Commercial Cleaners
If you’re dealing with stubborn or widespread mildew, you may need a store-bought mildew remover. Look for products labeled “mildew stain remover” or “bathroom mold & mildew cleaner.”
How to Remove Mildew from Common Bathroom Areas
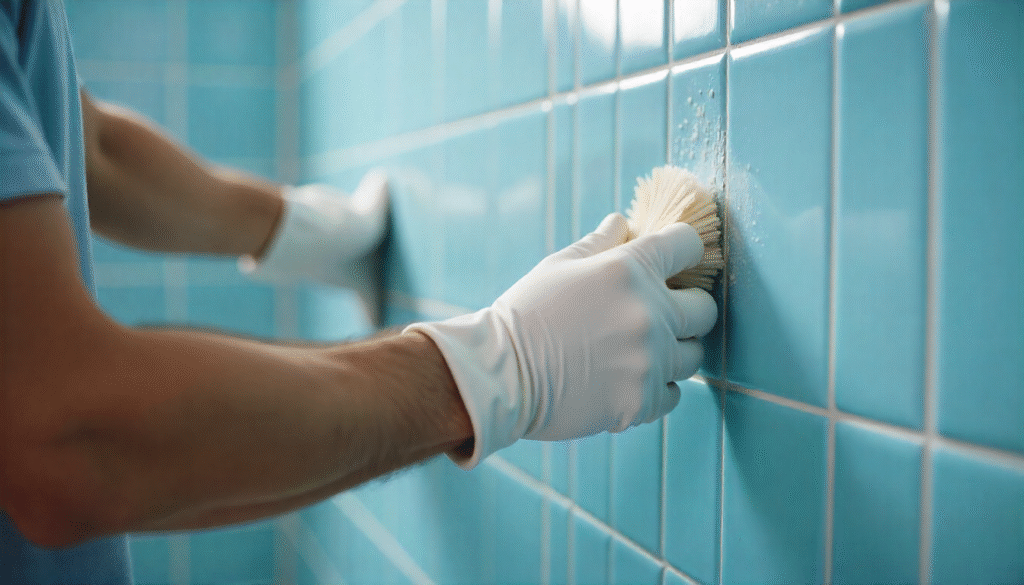
Shower Walls & Tiles
- Spray with vinegar or a mildew cleaner.
- Let it sit for 10–15 minutes.
- Scrub with a stiff brush.
- Rinse thoroughly with warm water.
Grout Lines
- Apply a paste of baking soda and water.
- Spray vinegar over the paste (it will foam).
- Scrub with a toothbrush to lift mildew from the grout.
- Rinse and pat dry.
Bathroom Ceilings
- Use a long-handled sponge or microfiber mop.
- Apply diluted vinegar or hydrogen peroxide.
- Wipe gently and avoid drips.
- Allow the ceiling to dry completely.
Glass Shower Doors
- Spray with white vinegar.
- Let sit for 5 minutes.
- Scrub with a non-scratch sponge.
- Rinse, then use a squeegee to remove water.
Caulking and Sealant Lines
- Spray with hydrogen peroxide or a strong mildew cleaner.
- Let soak for 10–20 minutes.
- Scrub carefully to avoid damaging caulk.
- Replace caulking if mildew is deep inside.
Homemade DIY Mildew Removal Solutions
Not every mildew problem requires strong chemical cleaners. Many effective solutions can be made using ingredients you already have at home. These DIY options are gentle on surfaces, budget-friendly, and perfect for routine maintenance. In this bathroom mildew cleaning guide, these homemade mixtures help you tackle mild to moderate mildew without harsh fumes.
Vinegar and Baking Soda Paste
This combination is one of the most reliable natural cleaners for bathroom mildew.
How to use it:
- “Stir baking soda with a little water until it forms a thick paste that can be easily applied.”
- Spread the paste over mildew-stained areas.
- Spray white vinegar on top—the reaction helps lift mildew from surfaces.
- Scrub with a brush and rinse thoroughly.
This method works especially well on grout lines, tile joints, and corners.
Hydrogen Peroxide Spray (3%)
Hydrogen peroxide is a powerful, non-toxic mildew remover that kills fungus and helps lighten stains.
How to use it:
- Pour 3% hydrogen peroxide into a spray bottle.
- Spray directly on mildew.
- Let it sit for 10–15 minutes.
- Scrub gently and rinse.
This is ideal for stubborn spots on tile, caulking, and shower doors.
Lemon Juice for Light Stains
Lemon juice works on mild mildew spots and leaves a fresh scent.
How to use it:
- Apply lemon juice directly to the area.
- Let it sit for 10 minutes.
- Scrub and rinse.
It’s best for light mildew on sinks, countertops, and glass.
When DIY Isn’t Enough
If mildew spreads deeply into caulking, grows behind tiles, or keeps returning even after cleaning, homemade solutions may not be strong enough. At that point, switching to commercial cleaners—or professional help—may be necessary.operly for Best Results
This step is crucial. Any leftover moisture will cause mildew to return quickly.
- Rinse all surfaces with warm water to remove cleaner residue.
- Wipe everything dry using microfiber cloths.
- Keep the exhaust fan running or open a window for at least 20 minutes.
Drying is one of the most important steps in any bathroom mildew cleaning guide, because mildew thrives in areas that stay damp.
Preventing Mildew from Returning
Cleaning mildew is important, but keeping it from coming back is the real key to maintaining a healthy bathroom. In this bathroom mildew cleaning guide, prevention plays just as big a role as cleaning because bathrooms naturally stay humid and damp—conditions mildew loves. With a few simple habits, you can stop mildew from growing again and keep your space cleaner for longer.
Improve Bathroom Ventilation
Moisture is the main cause of mildew, so proper airflow is essential.
Use an Exhaust Fan
- Turn it on before showering.
- Keep it running for at least 20 minutes afterward to remove humidity from the air.
- Clean the fan vent regularly for stronger airflow.
Open Windows When Possible
If your bathroom has a window, open it after showering to let steam escape quickly.
Keep Surfaces Dry
Drying surfaces prevents moisture from settling, which is one of the main triggers for mildew.
- Use a squeegee on shower walls and glass doors after bathing.
- Wipe countertops and sink areas with a microfiber cloth.
- Hang towels to dry instead of leaving them in piles.
- Replace damp bath mats frequently.
These small habits significantly reduce the chance of mildew making a comeback.
Follow a Consistent Cleaning Routine
Regular cleaning keeps mildew spores from settling and multiplying.
Daily Tasks
- Wipe down wet surfaces.
- Allow better ventilation by leaving the shower door or curtain open.
Weekly Tasks
- Clean tiles, grout, and shower walls with vinegar or a mild mildew cleaner.
Monthly Tasks
- Deep clean grout lines and recheck hidden corners for early signs of mildew.
In any bathroom mildew cleaning guide, consistency is one of the strongest defenses against regrowth.
Reseal and Waterproof Problem Areas
Grout and caulking naturally absorb moisture over time. If you notice cracks, discoloration, or flaking, it may be time to reseal them.
- Apply grout sealer every 6–12 months.
- Remove and replace old, damaged caulking.
- Seal around sinks, tubs, and shower edges to block moisture from entering.
Proper sealing prevents water from getting trapped—one of the most common causes of mildew in bathrooms.
Reduce Humidity in the Bathroom
If your bathroom stays humid throughout the day, especially in warm climates, consider using:
- A small dehumidifier
- Moisture-absorbing products like silica gel or charcoal bags
- High-ventilation shower curtains
Lower humidity directly reduces the chances of mildew returning.
When to Call a Professional Cleaning Service
Even with a strong routine and the right deep cleaning services, some mildew problems go beyond what regular home cleaning can handle. In any complete bathroom mildew cleaning guide, it’s important to know when DIY approaches aren’t enough. Calling a professional isn’t just about convenience—it’s about safety, long-term prevention, and protecting your home from deeper damage.
1. When Mildew Keeps Coming Back
If you’ve cleaned the same areas repeatedly and mildew still returns within days or weeks, there may be:
- Hidden moisture behind tiles
- Leaks inside the walls
- Poor ventilation that needs expert assessment
Professionals use moisture meters, advanced tools, and industrial-grade cleaners to stop the source of the problem—not just the surface stains.
2. When Mildew Covers Large Areas
If mildew spreads across:
- Entire shower walls
- Ceiling corners
- Multiple grout lines
- Window frames
…it may indicate a bigger moisture or ventilation issue.
Large infestations can release more spores into the air, which can affect indoor air quality and cause the bathroom to smell musty even after cleaning.
Calling a specialist ensures that every affected area is treated safely and thoroughly.
3. When You Notice Signs of Mold, Not Just Mildew
Sometimes homeowners mistake mold for mildew. Mold is:
- Darker (often black or green)
- Thicker or fuzzy
- More dangerous if inhaled
If you’re unsure whether the growth is mildew or mold, a professional can identify it and treat it properly. This is especially important if anyone in your home has allergies, asthma, or respiratory issues.
4. When Caulking or Grout Has Deep Stains or Damage
If mildew has penetrated:
- Shower caulking
- Tile grout
- Silicone sealant
…it may no longer be possible to clean it. Professionals can remove and replace damaged material safely, ensuring mildew doesn’t grow underneath the surface.
This prevents water from seeping behind tiles, which could lead to expensive repairs later.
5. When Structural Damage Is Possible
If the wall feels soft, the paint is bubbling, or tiles sound hollow, moisture may already have spread behind the surface. Professionals can detect the source of the leak or moisture intrusion and repair it before it leads to bigger problems like rot or mold growth.
6. When You Want a Deep Cleaning Without the Effort
Even if your bathroom isn’t severely affected, hiring a professional can help with:
- Seasonal deep cleaning
- Preparing your home for guests
- Resetting your bathroom after months of humid weather
Professionals use powerful tools such as steam cleaners and commercial disinfectants, giving you a fresh start.
Recommended Products & Tools for Bathroom Mildew Control
Having the right tools and products makes mildew prevention and cleaning faster, easier, and far more effective. In this bathroom mildew cleaning guide, these recommended items help you maintain a fresher, cleaner bathroom while reducing the chances of mildew returning. Whether you prefer natural solutions or strong store-bought cleaners, the products below will support both quick cleanups and deep cleaning sessions.
Essential Cleaning Tools
Microfiber Cloths
These are perfect for wiping moisture off tiles, mirrors, and countertops. They absorb water quickly and help prevent mildew-causing dampness.
Scrub Brushes & Grout Brushes
A stiff-bristle brush is ideal for scrubbing tiles, while a narrow grout brush helps remove buildup between tile lines.
Squeegee
Using a squeegee on shower walls and doors after each use reduces water buildup and drastically lowers mildew growth.
Old Toothbrush
Great for reaching tight corners, around faucets, and along caulking lines.
Mildew-Fighting Cleaning Products
White Vinegar
A natural disinfectant that breaks down mildew and prevents regrowth. Works well for weekly maintenance.
Hydrogen Peroxide (3%)
Effective for stubborn mildew patches and safe for many bathroom surfaces.
Commercial Mildew Removers
Look for labels like:
- “Bathroom Mildew Cleaner”
- “Mold & Mildew Stain Remover”
- “Tile & Grout Mildew Spray”
These cleaners work quickly and are ideal for tougher stains or deep cleaning.
Baking Soda
Excellent for scrubbing power without scratching surfaces..
Moisture-Control Products
Dehumidifier
A small bathroom dehumidifier helps reduce humidity levels, especially in homes located in humid climates.
Moisture Absorbers
Products like silica gel, charcoal bags, or calcium chloride packs absorb moisture from the air, keeping mildew from forming.
High-Ventilation Shower Curtains
Made from breathable materials, these curtains dry faster and resist mildew better than standard plastic ones.
Maintenance Tools for Long-Term Protection
Grout Sealer
Applying a clear grout sealer prevents moisture from penetrating tile joints. Use it every 6–12 months for best results.
Caulking Gun & Bathroom Caulk
If caulking is cracked, damaged, or stained with mildew, replacing it stops moisture from seeping behind tiles.
Exhaust Fan Cleaner
A simple vacuum attachment or spray helps keep your fan dust-free so it can remove moisture efficiently.
Conclusion
A clean, healthy bathroom starts with understanding what causes mildew and how to stop it before it spreads. This bathroom mildew cleaning guide gives you everything you need to identify mildew early, remove it safely, and prevent it from returning through proper ventilation, consistent cleaning routines, and moisture control. By using the right products, drying surfaces regularly, and staying proactive with maintenance, you can keep your bathroom fresh and mildew-free all year long.